lucanag.github.io
Twitter: @luca_nagy_
Instagram: @pushebp
Sound Synthesis
Tasks / Requirements
1.  An Ableton project
      1.  Without using any sampler (Sampler, Simpler, Impulse, Drum Rack, etc.)
      2.  Using real time, non-realtime input
      3.  Using edited note, velocity
      4.  Using MIDI controller
      5.  Using Recorded, edited automation
      6.  Using at least 2 built-in software synthetiser
      7.  Using at least 2 Insert effect
      8.  Using at least 2 Send/Return effect
2. At least 700 word analysis
3. Presentation
4. WAV file (90 sec)
Synthesis Analysis - rule 30
Luca Nagy
You can read it in Hungarian here.
Inspiration
I chose my inspiration source based on the topics which most impressed me and had the biggest influence to my personality. These are the recent improvements in different sciences and my endless curiousity regarding the future affected by our current knowledge in research areas. Stephen Wolfram, A New Kind of Science named book is which I recenty read and I have been amazed ever since, especially the rule 30 named cellular automation model in it. The encountered questions regarding future when I try to understand the author’s concept derived from this model is which I wanted to use as a source concept when I synthesize new sounds. My concept is so about an abstract future picture and improvements. This picture is not a relaxed, idyllic picture, rather a picture fulfilled with excitements, challenges, but in the same time with dark tones due to the uncertainty of the future, atmospheric sounds which are not experienced in our direct natural environment on Earth. I followed this concept when I syntentiyed 4 sounds, regarding it’s genre I would say it has more dubby elements especially that I was inpired by Heavenchord - 01 H.C.R.D.1 (dub44) in the structure and sequences. The following picture shows rule 30 which is the principle idea of the book.

“It always bothers me that according to the laws as we understand them today, it takes a computing machine an infinite number of logical operations to figure out what goes on in no matter how tiny a region of space, and no matter how tiny a region of time. How can all that be going on in that tiny space? Why should it take an infinite amount of logic to figure out what one tiny piece of space/time is going to do? So I have often made the hypothesis ultimately physics will not require a mathematical statement, that in the end the machinery will be revealed and the laws will turn out to be simple, like the chequer board with all its apparent complexities. But this is just speculation.” - Richard Feynman
Implementation Process
I divided my sounds into 3 groups, such as KERNEL, DRUMS, and ORNAMENT. The KERNEL and ORNAMENT symbolize my predefined concepts in the Inspiration paragraph. Regarding the DRUMS I only focus to not alter a lot on the ambient, mysterious mood by synentizing very strong drums. I used 5 times Operator, once Analog and once a Wavetable. I haven’t used presamples, but reused some sounds which I syntetized and used on more channels but with tiny modifications. I used 2 times Send/Return Delay as the same parameter set was fit to two sounds.

Firstly, I started with the KERNEL - SICK sound which I tried to make as mysterious as I can. Due to this I thought a substractive syntesis will be the proper from a rich sound wave, then I would slightly modify the Decay of the filter envelope on the Operator to receive an additional more dominant but still a good fit sound. With this and with small modification CHORD was born while I was playing with NATIVE INSTRUMENTS KOMPLETE KONTROL M32 to put the notes and create a melody. I focused to create similar melodies on the two channel.
Then, I continued with the DRUMS sounds synthezis where I used additive synthezis or I used only one oscillator with more audio effects.

Then I still felt some lack between the overall mood and the predefined concepts in the Inspiration part, so I started experimenting with the ORNAMENT group where I synthetised a PAD with the help of Wavetable and then put some high tones in HIGH STUFF channel by using Analog.
1, KERNEL

a, SICK
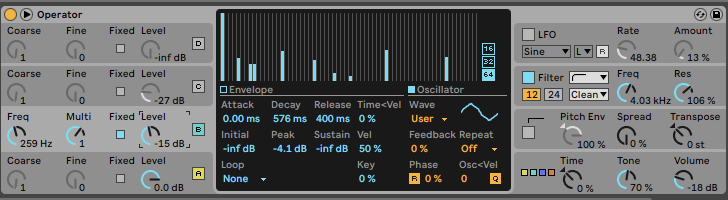
Since I wanted a more abstract but not too soft and supressed sound, I used a sawtooth wave with the built-in Operator with long attack and release time and by playing with the filter as a substractive synthesis. Since I don’t have a solid musical background using Chord was a huge help since a simple moll can be set easily only once and I can forget it in the followings when I play with the notes.

I used low pass filter MS2 based on a writeup and set the filter envelope to open and close fastly with short decay time. I wanted pitch sensitivity so I increased Freq<Key.

During I played with a controller, I realised I need more high frequency, so I used a band pass filter on Auto Filter with small rezonanse set. In order to make more excitment and make some movements I used LFO as modulator with small amplitude. Since I felt the sound a little bit dry in order to fill it with more colour I used a ping-pong Delay on the middle frequencies with high feedback set. Then, I realised I would use on other channels too, so I used as a Send/Return effect instead of Insert. I used automation in order to decrease the realese time which was effected by the high feedback.


I set notes by using then controller then I chose quantitized option besides some manually edited notes. I also played here with the velocity values.
At this point I was satisfied whit this sound, as the higher frequencies of this sound reminded me the voices of the Heptapods from the Arrival named movie, which movie’s mood is not so far from my vision defined in the Inspiration part. For this reason I used this sound heavily.
b, CHORD
Since I wanted a much powerful sound but still inherited from the previous sounds in order to match, I just copied the Chord and Operator from SICK and only modified the decay of filter envelope to increase it for fulfilling it with harmonics.

The new sound got to be much stronger with this so I used as the lead. I used Auto Filter LFO and automated it’s amplitude for movements. I recorded this automation. The only logic I used is to decrease the value when HIHAT appears for getting back to the base CHORD sounds.

Similarly to the SICK, I used Reverb and Delay, but by highlighting higher frequencies and using as an Insert effect.

2. DRUMS

a, KICK
I wanted a sound fulfilled with harmonics so again I decided to start from a Sw3 wave with zero attack and sustain and a medium long release.

I played a lot with the Pitch evelope decay value which seemed to play a key role in finding out the proper KICK which is not too strong and fit to my taste.

I used a Low pass filter with tiny resonance, zero attack and fast closing.

By playing the drive parameter of the Saturator I made the sound more powerful, then made the high frequencies more soft with an EQ Eight. In order to open the KICK gradually during the lead (CHORD), I automated the low pass filter on the Operator.
b, BASS
I used fixed 52Hz and sine wave, as I wanted a more soft element than the KICK. For this reason I was more cautious with the Pich envelope as well as the low pass filter catoff frequency. Drum Bass drive value was used for increasing the leftover frequencies.

c, HIHAT
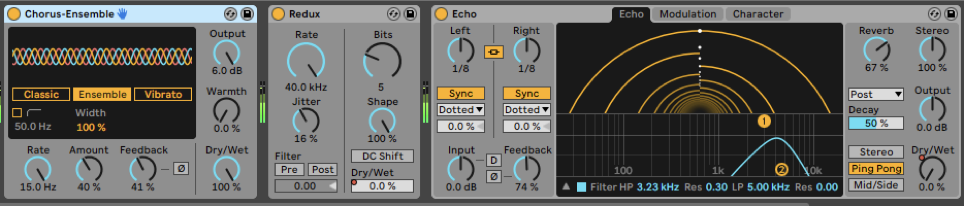
I spend a lot time with the HIHAT as first I check a tutorial where they only used a white noise with the built-in Operator. This was not so interesting as the metal elements were missing from it, so I used a custom wave format with additive synthezis whit low and middle amplitude harmonics. I cut the low frequencies but it was still not the best, so I realised that increasing the resonance is a good solution for get a proper hihat.

On top of these, I used Redux and Chorus for make it more dirty and metallic. Then I realised the problem was with my note lenght, so I shorten them. In the ending part I didn’t know on how to finish it so I just started decreasing the number of notes, using more automation on Redux dry/wet and Echo.

3. ORNAMENTS
The picture regarding the genre and mood was clear after the KERNEL and DRUMS implementation, so I wanted a pad noise which has more dark tone with some noises in the ending part. In the same time I felt my sounds week in high frequencies so my aim in this part was also synthetising some ornament of high noises.

a, PAD
The aim was here to synthetize a background sound which has a little bit worrysome impact to the whole sounds. I used a Wavetable Pink Noise with 26Hz square wave LFO. I wanted only the release part of it so I set high release of the amplitude envelope then used Saturator and Echo with high feedback on the high frequences.

In order to soothe the impact of this sound, I increased the envelope’s attack and simply cut the track volumes on the note-on parts. Then I used Auto Filer on the high frequencies to cut them off. Even it was only a pad noise I wanted to make it more colourful so I used LFO as a modulator on the Auto Filter. I realised that the Echo’s Noise generator is also fit to this sound, so I set some automation to it.


b, HIGH STUFF
The aim was to fulfill the boring parts with some higher frequencies. I used Analog with two oscillator with sawtooth waves to obtain more harmonics.

I set the note to G3 to fit to the CHORD and SICK main frequencies. I tried to soften this sound by increasing the filter and amplitude’s envelope attack of the first oscillator to open the low pass filter gradually. Then to make more movements and make the overall impact more colourful I set the second oscillator up to 2 octave. Echo and Decay was used with high feedback. For movements I used LFO on the Auto Filter and Delay as a Send/Return effect.
